In the update to my Ghost theme, Smart, I implemented a Saves feature. In this post, I'll discuss what the feature is and some of the code behind how it works.
What's Saves?
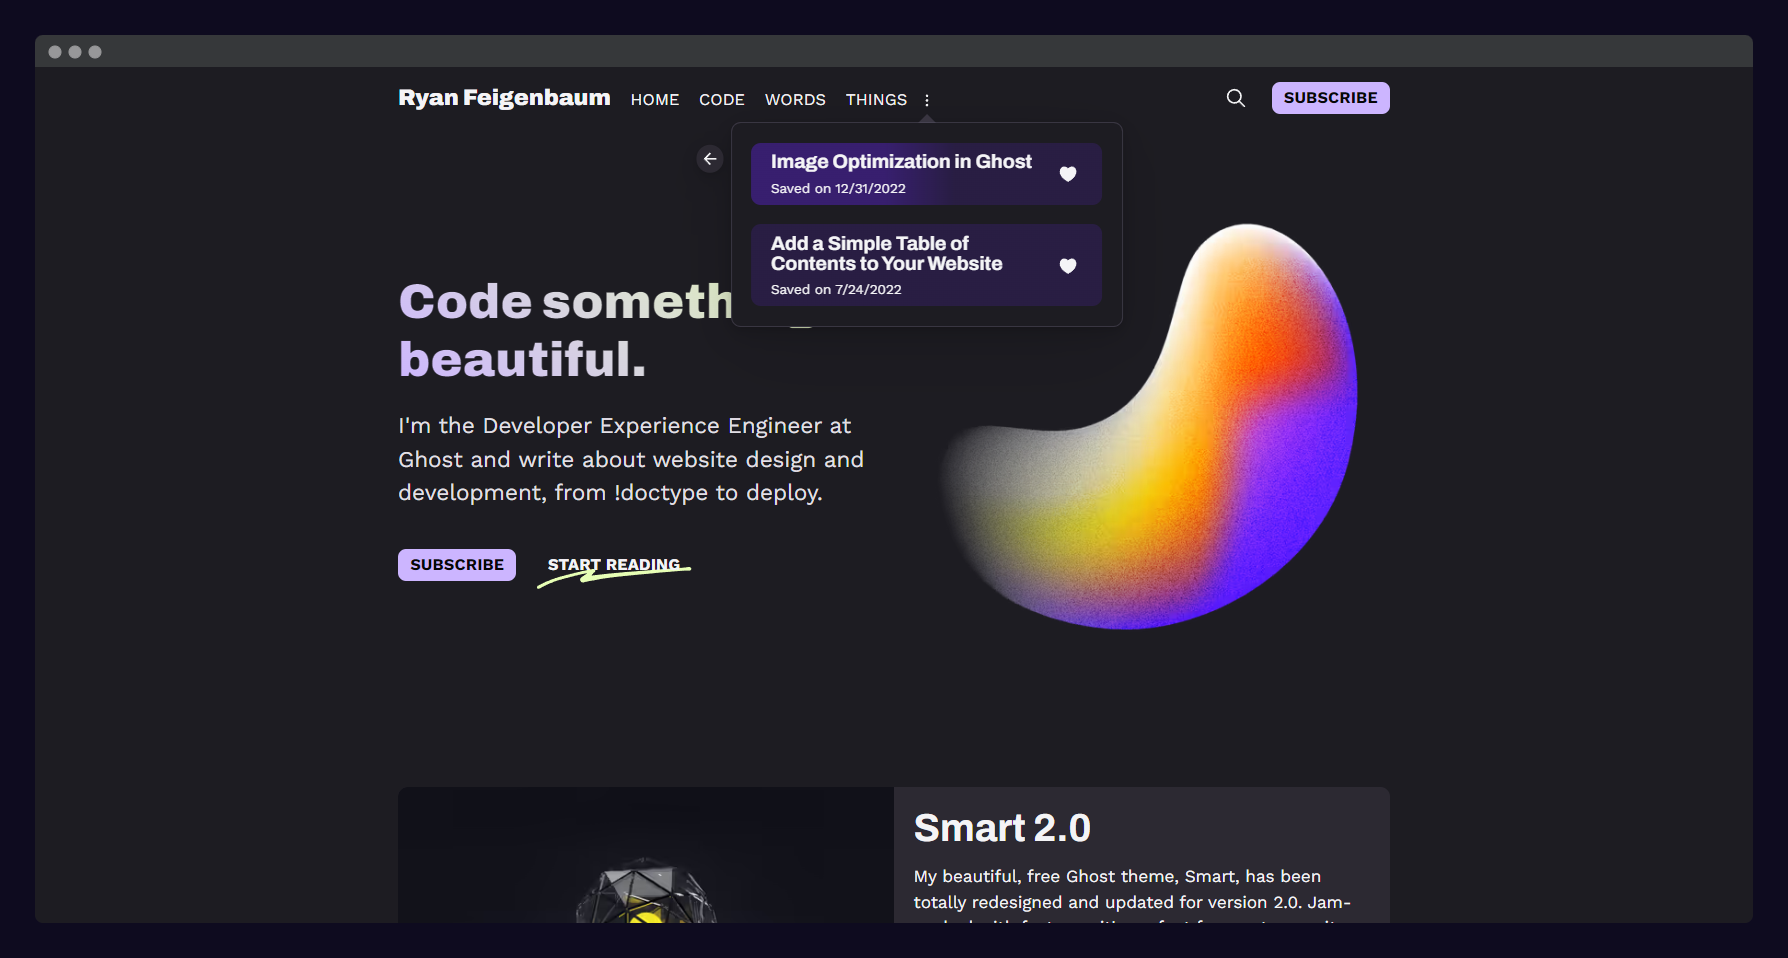
Saves allows readers to save/favorite/bookmark articles. In the header of this article, you can see the Save text followed by a small heart icon. Clicking this button saves this article to your saves collection, which is accessible via the overflow (...) menu in the navbar.
Your saved articles sync across the site and represented by a filled heart icon. These saves persist in local storage, which means that they will be saved across browser visits (you can close and reopen your browser and they'll still be there). But only if you're using the same browser. The plus side is that you're not sending anything to the cloud, but the downside is there's no cross-device/browser support. (More on localStorage later.)
In addition to saving the article, Saves also keeps the date you favorited the article and your progress through it. This means that when you return to the article, you will be automatically scrolled to where you left off!
How It's Made
Saves is a feature that prima facie seems simple enough. A user clicks a heart and the app notes the change and updates the UI. But once you get into actually building it, the complexity becomes more apparent.
- The UI has to be updated in multiple places, not just where the user clicked. For example, on the desktop and mobile menus
- The UI has to be updated on multiple events, not only when the user does something, but also upon initial page load
- You have to account for whether the user is on a saved page and whether the page references any other saved articles
- You have to account for there being no saves
- You have to account for there being multiple saves, and one, two, or all of them being removed
Perhaps it's naivety, but this feature turned out to be harder to code than I first thought.
I decided to take an object-oriented (OOP) approach, where I created a Saves class with a set of methods. Here's an outline of the class:
class Saves {
    constructor(e) {
    // Grab the id and title from the click event.
    // Grab the saved items list from local storage
    }

    generateItem() {
        // Construct the saved item object
    }

    save() {
        // Save an item
    }

    remove() {
        // Remove an item
    }

    scrollStatus() {
        // Get scroll status (how far the user has progressed down the page)
    }

    identifySaves() {
        // Find which items on the page are already saved and update the UI
    }

    isCurrentPageSaved() {
        // Determine whether the current page is saved
    }

    step() {
        // Continuously update scroll position when user is on a saved page

    updateScrollPosition() {
        // Update the scroll position
    }

    renderSavesMenu() {
        // Generate the Saves menu HTML
    }

    populateSavesMenu() {
        // Add that HTML to the page
    }

    init() {
        // Everything to do on initial page load
    }

}
You can see that a whole lot of methods are required to implement this feature. Because it's the bread and butter of this thing, let's go through the save method in detail.
Save method
Here's the code for the save method, which is called whenever a user saves an article.
save() {
    localStorage.setItem(
      'saves',
      JSON.stringify([this.generateItem(), ...this.items()]),
    );

    this.populateSavesMenu();
    this.updateScrollPosition();

    const els = document.querySelectorAll(`button[data-id=${this.id}]`);
    els.forEach((el) => {
      el.classList.add('sm-love-toggle');
    });
  }
The first part of the method saves the item to localStorage, which is an API for accessing a storage object.


This data is saved to the user's device in the browser and, importantly, is persisted across sessions. That means that you can close the browser or restart your device, but that data will still be available. However, as the name implies, localStorage is local—it only exists in your browser and doesn't sync across devices or even other browsers. (For that, you'd need a server and a whole lot more code.) You can see what's included in localStorage by opening your dev tools and going to the Storage (Firefox) or Application (Chrome) tab.

I write the saves to localStorage using its setItem method:
localStorage.setItem(
  "saves",
  JSON.stringify([this.generateItem(), ...this.items()]),
);
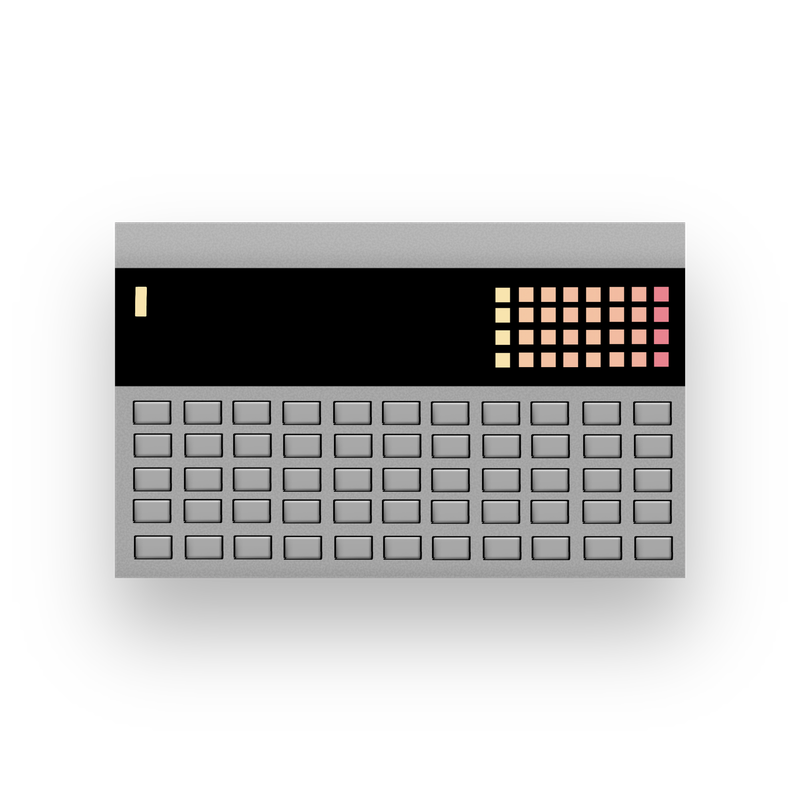
This data gets the saves key. Then, I spread the existing saved items into array an with the new item. Because localStorage only accepts strings, I stringify the array before saving it. Here's a screenshot of how these saves look in dev tools:
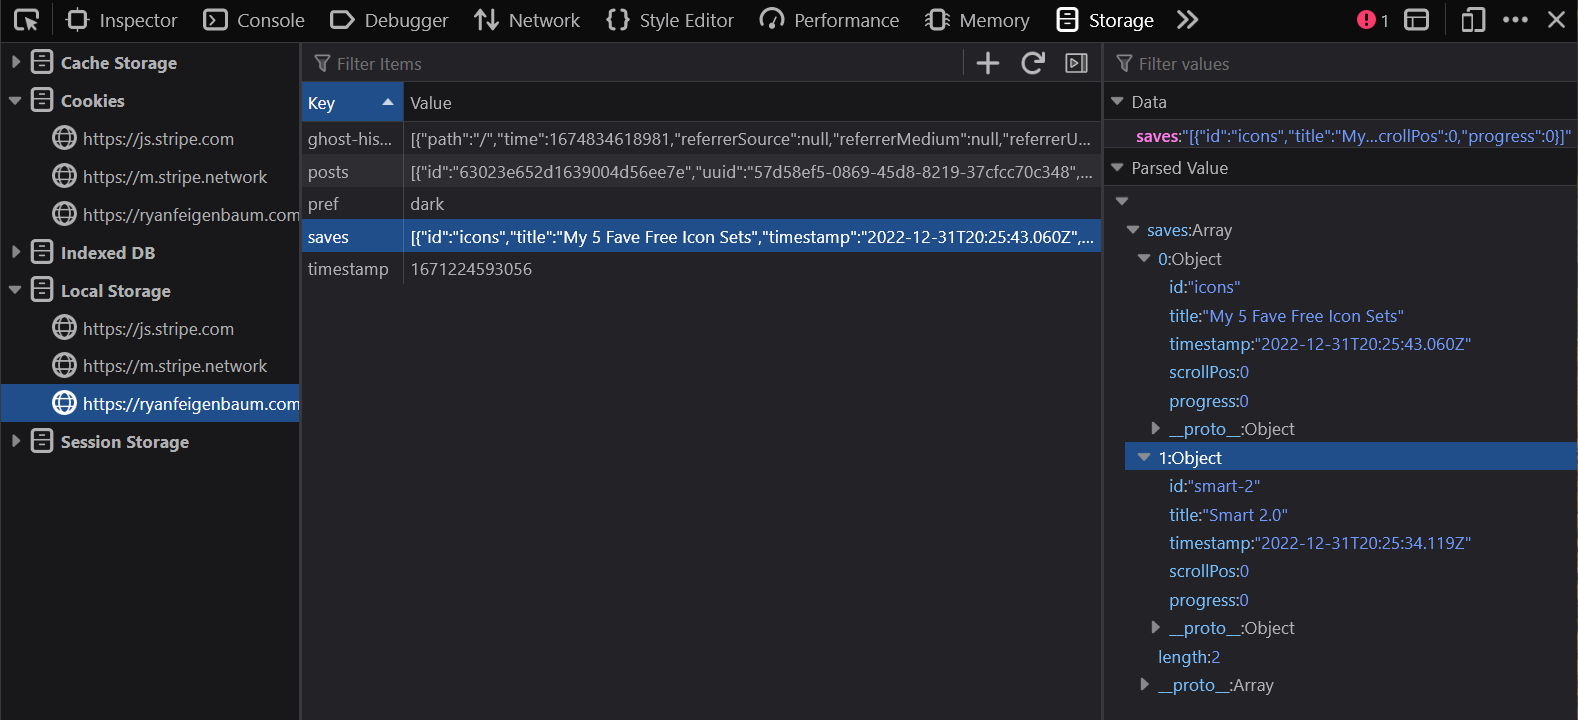
The saved item includes an id, title, timestamp of when it's saved, scroll position, and a computed value of the progress through the article.
After committing the saved item to storage, I update the saves menu and scroll position. This makes the UI reflect the true state of things and tracks the position of the user in the article if they're on the page they saved.
The last bit of the method is changing the icon from a heart outline to a filled-in heart, indicating that the item has been saved.
const els = document.querySelectorAll(`button[data-id=${this.id}]`);

els.forEach((el) => {
  el.classList.add("sm-love-toggle");
});
The first line of code selects all buttons on the page that have the id of the saved article. For this code to work, I added the id in my template:
<button
  class="sm-circle-icon-button sm-love-button"
  data-id="{{slug}}"
  data-title="{{title}}"
  aria-label="Save {{title}} to favorites"
>
  <span class="sm-heart-outline-icon">
    <svg><use href="#sm-heart-outline-icon"></use></svg>
  </span>
  <span class="sm-heart-fill-icon">
    <svg><use href="#sm-heart-fill-icon"></use></svg>
  </span>
</button>
The important bit is data-id="{{slug}}", which includes the article's slug (guaranteed to be unique) as a data attribute on the button. Having this identifier allows me to select it when needed, as in the save method. Because multiple buttons live on the page (in the desktop and mobile saves menu and in the post meta area), I opted for the data attribute (data-id) rather than just the id because it's illegal to have elements with the same id.

The final step is to add the CSS class sm-love-toggle to the button, which, through the power of CSS, hides the outlined version of the icon and shows the filled-in one.
.sm-love-button .sm-heart-fill-icon {
  display: none;
}

.sm-love-button.sm-love-toggle .sm-heart-outline-icon {
  display: none;
}

.sm-love-button.sm-love-toggle .sm-heart-fill-icon {
  display: inline-block;
}
If you're interested in how the rest of it works, the code is all open source. There are most certainly better ways to do things—please let me know or make a PR.
 royalfig
Custom events?
I'm interested in whether custom events would simplify the saves feature. You're likely familiar with standard browser events like click and change, but it's also possible to define your own.
With this API, I could define custom events like onSave and onRemove. I suspect this could refine the code, but I'm not sure yet. If anyone has experience with customEvents, let me know!
My Smart Ghost theme is free and open source. Check it out: